Saturday, December 15, 2012

Fun With Hot Wax....

...No, not that kind of fun! I'm talking about making beeswax candles! Needing my honeybee "fix" during the cold winter weather and needing some holiday gifts to give, I decided that I would make candles this year. It was fun and it went well. I have been collecting and saving wax for the past 3 years and it was time to put it to use. Here are some photos to help tell the story and learn you how we did it...

First step in cleaning old comb, melt in water bath

After melting the wax in a water bath, I let the wax cool and harden. The debris will settle to the bottom of the wax "cake". You can scrape off the large pieces of debris. Then melt the wax again and pour the liquid wax through a fine strainer to get the small pieces of debris out. You may need to strain it a few times. When it looks really clean, pour it into a mold (Tupperware container, Trader Joe's cookie container - see wax below). If your wax is too hot when you pour it, you will melt your plastic containers (I speak from experience on this one!). And oh yeah, don't use your cooking pots for doing this stuff, they will get ruined.


Cleaned Wax

Above you can see the cleaned wax. Notice the different colors. This is mainly determined by the age of the comb - the older the comb, the darker the wax. Some people use chemicals to lighten the wax and some say leaving it in the sun can lighten it. I kind of like the variety of colors. The lightest wax is obtained from the wax cappings you get during honey extraction.

Melting Clean Wax Before Pouring in Molds

To prepare the wax for pouring into molds, you want to melt it using a double-boiler, water bath method. Don't melt the wax directly in a pot over fire, wax is flammable and no one wants a fire in their kitchen!


Here you can see me helping the kids pour the hot wax into the votive molds. Notice the beehive skep mold also, it is filled with hot wax. Rubbing some vegetable oil inside of the molds helps the finished candles to release from the molds more easily (they also sell silicone sprays for this). I bought preassembled wicks for the votives (see below). I had to install the wick in the beehive skep mold. The wick comes through a tiny hole in the bottom of the mold and then must be secured at the top so the wick stays straight. I tied the wick to a small piece of wood on top (piece of shish-kabob skewer).

         
Putting the wicks in the votives. You must wait until the wax cools a bit, or else the wicks will wilt and won't be straight. Once you see a little cooled wax around the rim of the mold, you can gently insert the wick. The kids did a great job.


Cooled and Ready to Remove

Gorgeous!

We also poured some tapers. These were the most challenging, mainly because of installing the wicks. The wick had to be threaded through a small hole in the bottom and then secured on top, just like the beehive mold (except 10 inches long!). With some creative threading, I finally got the hang of it (used the shish-kabob skewers again). They do sell wicking needles for this, but I didn't buy one. When pouring these, one must not forget to plug the wick hole in the bottom of the mold, lest hot wax comes oozing out all over your kitchen table (yes, speaking from experience again!). You can use a small bit of hard beeswax to plug the holes and it works just peachy.


The tapers were also a little tougher to get out of the molds. After they had hardened and cooled down, I placed the entire mold in the freezer, which caused the wax to contract and made it much easier to get the candles out. 


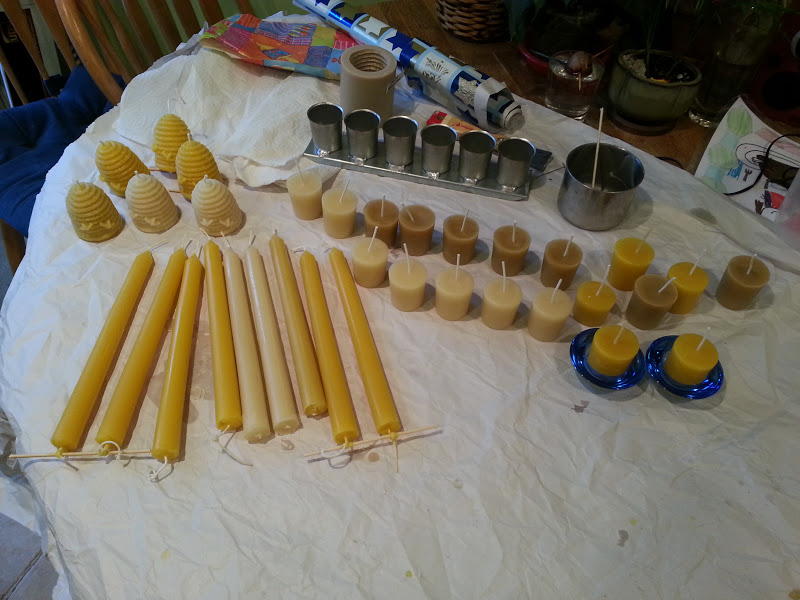
The fruits of our labor. Not bad for our first attempt. I have a bit more wax left for some more candles and we're also going to try to make some lip balm. Fun fun fun...


Tuesday, October 2, 2012

Honey Bees, Wasps and Hornets - Oh My! Or, What kind of "bees" are these?

Since I started doing bee removal jobs in the Philadelphia region, I have fielded tons of calls that end up being about stinging insects other than honey bees. I don't deal with these other insects, I refer them out to someone else. I wanted to create a quick guide that will help people to learn about whether their bees are honey bees or not, because even though we like to call everything that flies and stings a "bee", that is surely not the truth.

Is it a Honey Bee Hive?

Is it hanging from a tree or from the eaves of your house or your window? Does it look grayish and kind of papery? Does it look like clay or mud? Does it look like any of these? Did you just notice it in July as it started to grow larger?

Images from Google Search for "Wasp Nest"

If the answer to any of these questions is "Yes", then we are not dealing with honey bees. In fact, chances are, if the hive is out in the open and you can see it, they are not honey bees.

Honey bees usually build their colonies inside of structures (whether those "structures" are walls, eaves, roofs, trees, planters, birdhouses, fire hydrants, etc - doesn't matter too much to the bees). And remember that honeycomb is made out of beeswax, not mud or twigs or papery substances. There are rare occasions when honey bees will start building their hive from a tree limb out in the open, but that doesn't happen too often in our climate (Philadelphia, PA, USA). And if it did, the comb would look white and waxy, not gray and papery or muddy and you would see many, many bees on the comb. Here is what honeycomb looks like...

Large sheets of honeycomb

Comb in a wall

Wavy comb in the ceiling


One other important point is that a honey bee hive will have LOTS of activity and traffic on a nice summer day. You will see tens, if not hundreds, of bees coming and going every minute. If it is a nice warm summer day and you are only seeing a few insects here and there every few minutes, chances are they are not honey bees. A mature honey bee colony will have tens of thousands of bees in it, while most social wasp and hornet colonies will have hundreds (or less) to maybe a few thousand.

Is it a Honey Bee Swarm?

I also get calls about a "humungous swarm of bees" flying all over our yard and attacking our children - only to find out that its 10 yellow-jackets eating a lollipop that one of the kids threw on the ground. A swarm of Honeybees has THOUSANDS and THOUSANDS of bees in it. If they are flying, they will fill the air like a scene from a hollywood movie. If the swarm has landed, it will be in a cluster the size of a grapefruit at the minimum and a beachball or larger at the maximum. No other stinging insect swarms and clusters like this, so if you are seeing this phenomenon, it is most assuredly honey bees that you are seeing. Swarming is the natural way that honey bee colonies reproduce and it is a totally normal and typical event for honey bees.

One other important thing to remember is that honey bees that are in swarm mode are very docile. So even though it looks scary, there is nothing to worry about. Before leaving their previous home, they all gorged on honey in order to have some resources on hand when they set up their new home, so all of the bees have that post-Thanksgiving dinner tryptophan feeling. If they could be sitting on the couch watching football, they would be! While the swarm is gathered on the tree/fence post/fire hydrant/wherever, they are scouting for a new home (hopefully not in the walls of your house) and most swarms will move on in a day or two if left alone. But, if you see a swarm, definitely call or email me. Beekeepers love to catch swarms and it is pretty cool to watch. If you can't get a hold of me, try this list of beekeepers willing to pick up swarms. Here are some photos of honey bee swarms to help...

Swarm on bleachers

Swarm on tree limb

Swarm on ground in bush

Swarm on tree limb

And a (grainy!) video of a swarm in progress (turn up the volume!)...


And finally, I know it can be tough to differentiate between a honey bee and a yellow-jacket and a bumblebee and a hornet or one of the many other flying, stinging insects. Here is a decent guide. And here is an adorable picture of a honey bee, notice the fuzzy mid-section, which wasps and hornets do not have (photo courtesy of Amy Hsu)...


You can always call me to help you identify the insect, but hopefully this little guide has helped!

A Bevy of Bumbles

Well, we here a lot of news these days about bee die-offs, pollinator shortages, pesticide poisonings and other doomsday proclamations but things are looking just peachy in our little neighborhood. I went out in the yard about 10 days ago and what I saw made my jaw drop open. I saw a bumblebee bacchanalia on the sedum that has rapidly spread in our yard from one plant that I inherited from my dad's container garden collection. 


You can see a few honeybees on the sedum too in the video. Bees always love this plant and its nice because it is a late season bloomer. But I have never seen anything like this. The kids and I were petting the bumblebees and they were so nectar-drunk that they didn't care a wink. Here are a few stills - you can even see pollen grains on their fuzzy little backs (click on the photos to enlarge them).


Oh, and here's another picture from earlier in the summer. I put out one of the filters I use for cleaning beeswax and it's lovely smell attracted a plethora of pollinators. Here you can see some honey bees, a red wasp, some yellow-jackets and a teensy wittle itty bitty fly in the upper left all happily co-existing (well, there was a little jousting, but they were hanging out on this together all morning that day).


Monday, August 20, 2012

Attendees of Guild Meeting on Thurs, Aug 18, 2016 can download Adam's Powerpoint "3 Steps to Healthier Bees" here. In order for the links to be active, you will need to download it and not just view it in Google Drive.


Adam can be reached at phillybees at gmail dot com if you have any questions. Thanks!

Three Steps to Healthier Bees

Attendees of Philadelphia Beekeepers Guild Meeting on Thurs, Aug 18, 2016 can download Adam's Powerpoint presentation "3 Steps to Healthier Bees" here. 


Adam can be reached at phillybees at gmail dot com if you have any questions. Thanks!

Tuesday, August 14, 2012

Strange Removals Part II

I know you have been waiting with bated breath, so here is the rest of the story of my Summer of Strange Removals. After the Conshohocken job, the next bee removal job was in Northeast Philly at Disston Precision, a company that dates back to 1850 and is still functioning as a manufacturer of custom steel supplies, including saw blades. The bees were living in a window cavity, where the window had been removed and the space boarded up. 

View From Outside
View From Inside


We felt that this would be a fairly straightforward job - we'd just remove the large piece of plywood on the inside of the window, expose the hive and remove the bees and comb. And this is pretty much how things went. Although, when we opened the cavity, once again we saw very few bees in the hive. But have a look at these huge, gorgeous sheets of comb.


View from the bottom of the comb

We gradually removed sheet after sheet of comb and while we were seeing some bees, we were only seeing honey comb and no signs of any brood.


We got through the entire hive and there was absolutely no brood at all. No eggs, larvae or capped brood, no queen either.  With no brood comb to worry about and not too many bees, this was a quick and easy job. Because there were some bees in the hive, still working and gathering nectar, the honey was clean and there were no wax moths like there were at the job in Conshohocken. Joel saved the honey to use for making mead. We vacuumed up the bees that were there and Joel just set them free near his hives so they could join another colony.

So for the third time this summer, there were basically no new bees to add to my apiaries. Because there was no queen and no brood, the genetics of this hive would not be passed on and couldn't be preserved. My guess about this hive is that they swarmed some time in the early summer and were unsuccessful at making a new queen. They probably tried to make a new queen but if the new queen somehow got damaged or killed (eaten by a bird on her mating flight?) and there were no more eggs left in the hive, this hive would eventually die out because they wouldn't be able to make a new queen. Once all of the brood were hatched and there were no more young to care for, the remaining bees are left only to gather bunches and bunches of nectar and turn it into honey. And that's what they do, because that's what they know how to do!

Sometimes in this queenless situation, you will get what is called a "laying worker". This is when, in the absence of a viable queen and with no resources to make a new queen, one or more worker bees start to lay eggs. Problem is that the workers can only lay unfertilized eggs, which become male bees or drones. This is a last ditch effort to try to perpetuate the genetics of the hive, hoping that one of the drones will be able to mate with a queen somewhere and thus carry on the genes. There is a possible exception to this hopeless drone-laying worker situation called "thelytoky". Thelytoky is when a female is produced from an unfertilized egg. If the laying workers can create females bees, then the colony would be able to make a new queen with one of the female eggs that the laying worker lays. Confused yet? Dee Lusby, of Organic Beekeepers Yahoo Group fame, regularly insists that thelytoky is not as rare in honey bees as some would lead us to believe.

Ok, sorry for the biology lesson digression - back to the removal jobs. The final job of the summer was in West Philadelphia at a beautiful old Dominican Convent that is now an apartment building. The bees were entering the house through a third floor dormer and lots of bees were getting into other parts of the house via the attic and ductwork. The bees apparently had been there for several years and the owner had them sprayed earlier this summer. An unscrupulous exterminator told the homeowner that these were not honey bees so that he could spray them and make some money off of the job. Boo!!

Here we are getting things set up. The bees were entering the house near the little window to the left of the vacuum set-up. Little did we realize at this point that once again, we would not be needing the bee vac!


Finding the hive in the walls was challenging as the exterior and interior of the building were a mess of angles and weird compartments. We made a few holes in the walls and didn't find anything until our fourth attempt, the one that Jeff is working on in the picture below. 


 Here is what the inside of the wall looked like. But notice, once again, NO BEES!


Looking down into the cavity, some big sheets of comb...


There were a few bees coming and going, but we quickly realized that these were robber bees from another hive stealing the honey and that there were actually no bees living in this hive. One way to tell that the hive was being robbed was that the comb was all chewed up and raggedy with lots of capping wax on the floor.

As we proceeded to remove comb. At first all we were seeing was new, white honey comb and no brood comb. After we removed most of the honey comb, we saw that the comb kind of went around the corner down towards the bottom of the picture above. The rest of the hive ended up being under the little window. Here we found more honey and the dark brood comb and a bunch of wax moths, but still no bees, dead or alive.


We also soon realized that the few robber bees that were coming inside were quickly dying. It is normal for the bees to gather at a window during a removal job, going toward the light to try to get outside. But it is not normal for them to die within minutes. We figured that whatever had been sprayed in this hive was still killing the bees as they stole the honey. The bees that had been living here must have absconded once the insecticide was sprayed because there was no huge pile of dead bees inside the hive as one might expect when a hive is poisoned.

Poor dying bees on the window

Here is a big ol' bag of contaminated honey and comb, it weighed at least 40 pounds. Because it had been sprayed, neither of us wanted anything to do with this mess so we trashed it all.


At the end of the day and for the 4th time this summer, I did a removal job and didn't have any bees to show for it. But the summer wasn't a total loss - it is always great to see the feral hives and how the bees organize things. And all of the homeowners were happy to have the hives and comb out of their walls. And I also made a few bucks to help support this addictive hobby of mine. My next post will be about the Treatment Free Beekeeping Conference that I attended in Leominster, MA a few weeks ago.

Thursday, July 19, 2012

A Summer of Strange Removal Jobs - Part I

I have done 4 honey bee removal jobs this summer and they have all been unusual in their own way. I worked with Joel and Jeff Eckel, of We Bee Brothers fame, on each of the jobs (though that's not the unusual part!). Maybe this wacky hot weather is causing some of this weird stuff, who knows. Let's have ourselves a looksie...

The first removal of the summer was at the Philadelphia Navy Yard in an old abandoned Navy theater that is being renovated into medical offices. The foreman of the demolition team called me in an effort to remove and save the bees before they needed to destroy and redo the roof. The bees were entering the building in the gaping hole in the top right corner of the building. 


The inside of the building was totally bombed out, there were no stairs to get up to the 2nd floor, so we had to haul our stuff up a ladder...


We would access the bees from a little bathroom and when I opened the door, my mouth dropped open. On the floor of this room was a tremendous pile of dead bees, 2 inches deep in places. I had never seen anything like it. I think that all that it meant was that this colony had been here a long time and this was just the accumulation of years of dead bees. I wish I could share the funky smell with you...


  Anyway, we set up some scaffolding and Jeff got to work and opened the ceiling to reveal the hive.

We vacuumed bees and removed comb. Jeff spotted a bunch of swarm cells as he was vacuuming bees and we quickly realized that we got this hive just as they were preparing to swarm. Lucky us! We got to see 6 or 7 virgin queens hatching out of their cells, a couple of them came out right into my hands (sorry no pictures)! When a hive is getting ready to swarm the workers will keep the queens in their cells until the colony decides that it is time to swarm. The workers will feed the queens through a small hole in the queen cell and they will keep adding wax to the cell as the queen tries to emerge, effectively keeping her confined until they are ready to let her out. Once we disturbed the hive, the workers could no longer attend to the queen cells and the queens were able to leave their cells. Pretty awesome! We caught 3 of the virgin queens and put them in queen cages with a few worker bees to attend to them. We would try, unsuccessfully, to get those virgin queens mated in our beeyards.


There were some parts of the hive that were tucked up in the rafters and we really couldn't access them without causing major structural damage to the building. I worked on tying the comb into frames in my little blue workshop (picture below) across the hall, nice ehh?


We removed as many bees and as much comb as possible and I think the demolition team just killed the remaining bees a few days later. I set these bees up in my Francisville apiary and when I went to check on them 10 days later - the hive was totally empty of bees! They left me! I think they were still in swarm mode and they just took off to who knows where. So, unfortunately, when it was all said and done I didn't get to keep the genetics and add this colony to my apiary. This is the first time I have ever had a colony abscond on me, drats!


The second removal job of the summer was in Conshohocken. Remember the swarm I caught earlier in the summer out in Conshy? Well, a few weeks after that one, I got a call from the same homeowner telling me there was ANOTHER swarm in his yard. Here's a quick video from that second swarm in Conshy, I caught the swarm actually happening and stood in the middle of it as I took the video. It was quite an exhilarating experience to stand in the middle of these bees! Turn up the volume so you can hear them!


I knew that both of these swarms came from a house nearby where bees were living in the walls and this was the second removal job of the summer. Joel and I did it a month after I had captured the second swarm. Fellow Guild member Amy Hsu watched us and took some great photos - all of the photos below were taken by Amy. When I got to the house and took a look at the spot where the bees had been entering the house, I saw something odd - there was no traffic going in and out. It was a warm summer day and the hive should have been busy working. I stood there for a few minutes and saw only one or two bees go in. Hmmm...

We got to work. We opened the ceiling and this is what we saw...

Wavy Honey Comb

Beautiful, no? Only problem is, this comb should have been crawling with bees! But there was barely a bee to be found, what gives? My only theory is that this hive swarmed twice and then for some reason they completely abandoned this space. They had been here at least a month ago, because I saw them swarm on that day. Between then and the day that we did this job, the bees decided to skedaddle. We did come across a handful of bees, but these were just some poor, lost stragglers. There was still a decent amount of honey in the hive, and there were some other friends dining on the delectable delight...

Wax Moth Larvae - Yum!
 
When a hive is uninhabited, it doesn't take long for wax moths to move in. In the photo above you can see the larvae that have infested the honey comb. They eat the honey, beeswax and pollen that is stored in the comb. They are basically the clean up crew for empty hives.  Normally the bees keep them at bay but once the bees are gone, the wax moths take over and completely destroy/clean up the comb.

Wax Moth Cocoons 


This is what the ceiling looked like. The first hole revealed nothing so we had to move the second hole over to the next joist space to find the hive. Sometimes locating the precise location of the hive is the toughest part of the job.


We cleaned out the ceiling cavity pretty well and wrapped up the job. Joel took the wax moth-laden comb to feed to his chickens, who I am sure very much appreciated the gesture!

Cleaned Out Ceiling Cavity


One Lonely Little Lady

So, two removal jobs and no bees to show for it (unless we count the two swarms from the Conshohocken hive, both of which are doing quite well so far). I did get some nice drawn comb from the Navy Yard bees, which I have already put into use in other hives. And I managed to salvage some other wax that I'll make into candles in the fall.  I'll write about the other 2 removal jobs in my next post...